
SmartFleet Corrosion Audit System - User Instructions
For Corrosion Audit Managers
Overview
As a Corrosion Audit Manager, you are responsible for setting up and overseeing the corrosion inspection process for Class 150 rolling stock. Your role involves creating audit templates, monitoring audit progress, and ensuring compliance with RSSB requirements following the Carmont derailment in 2020. 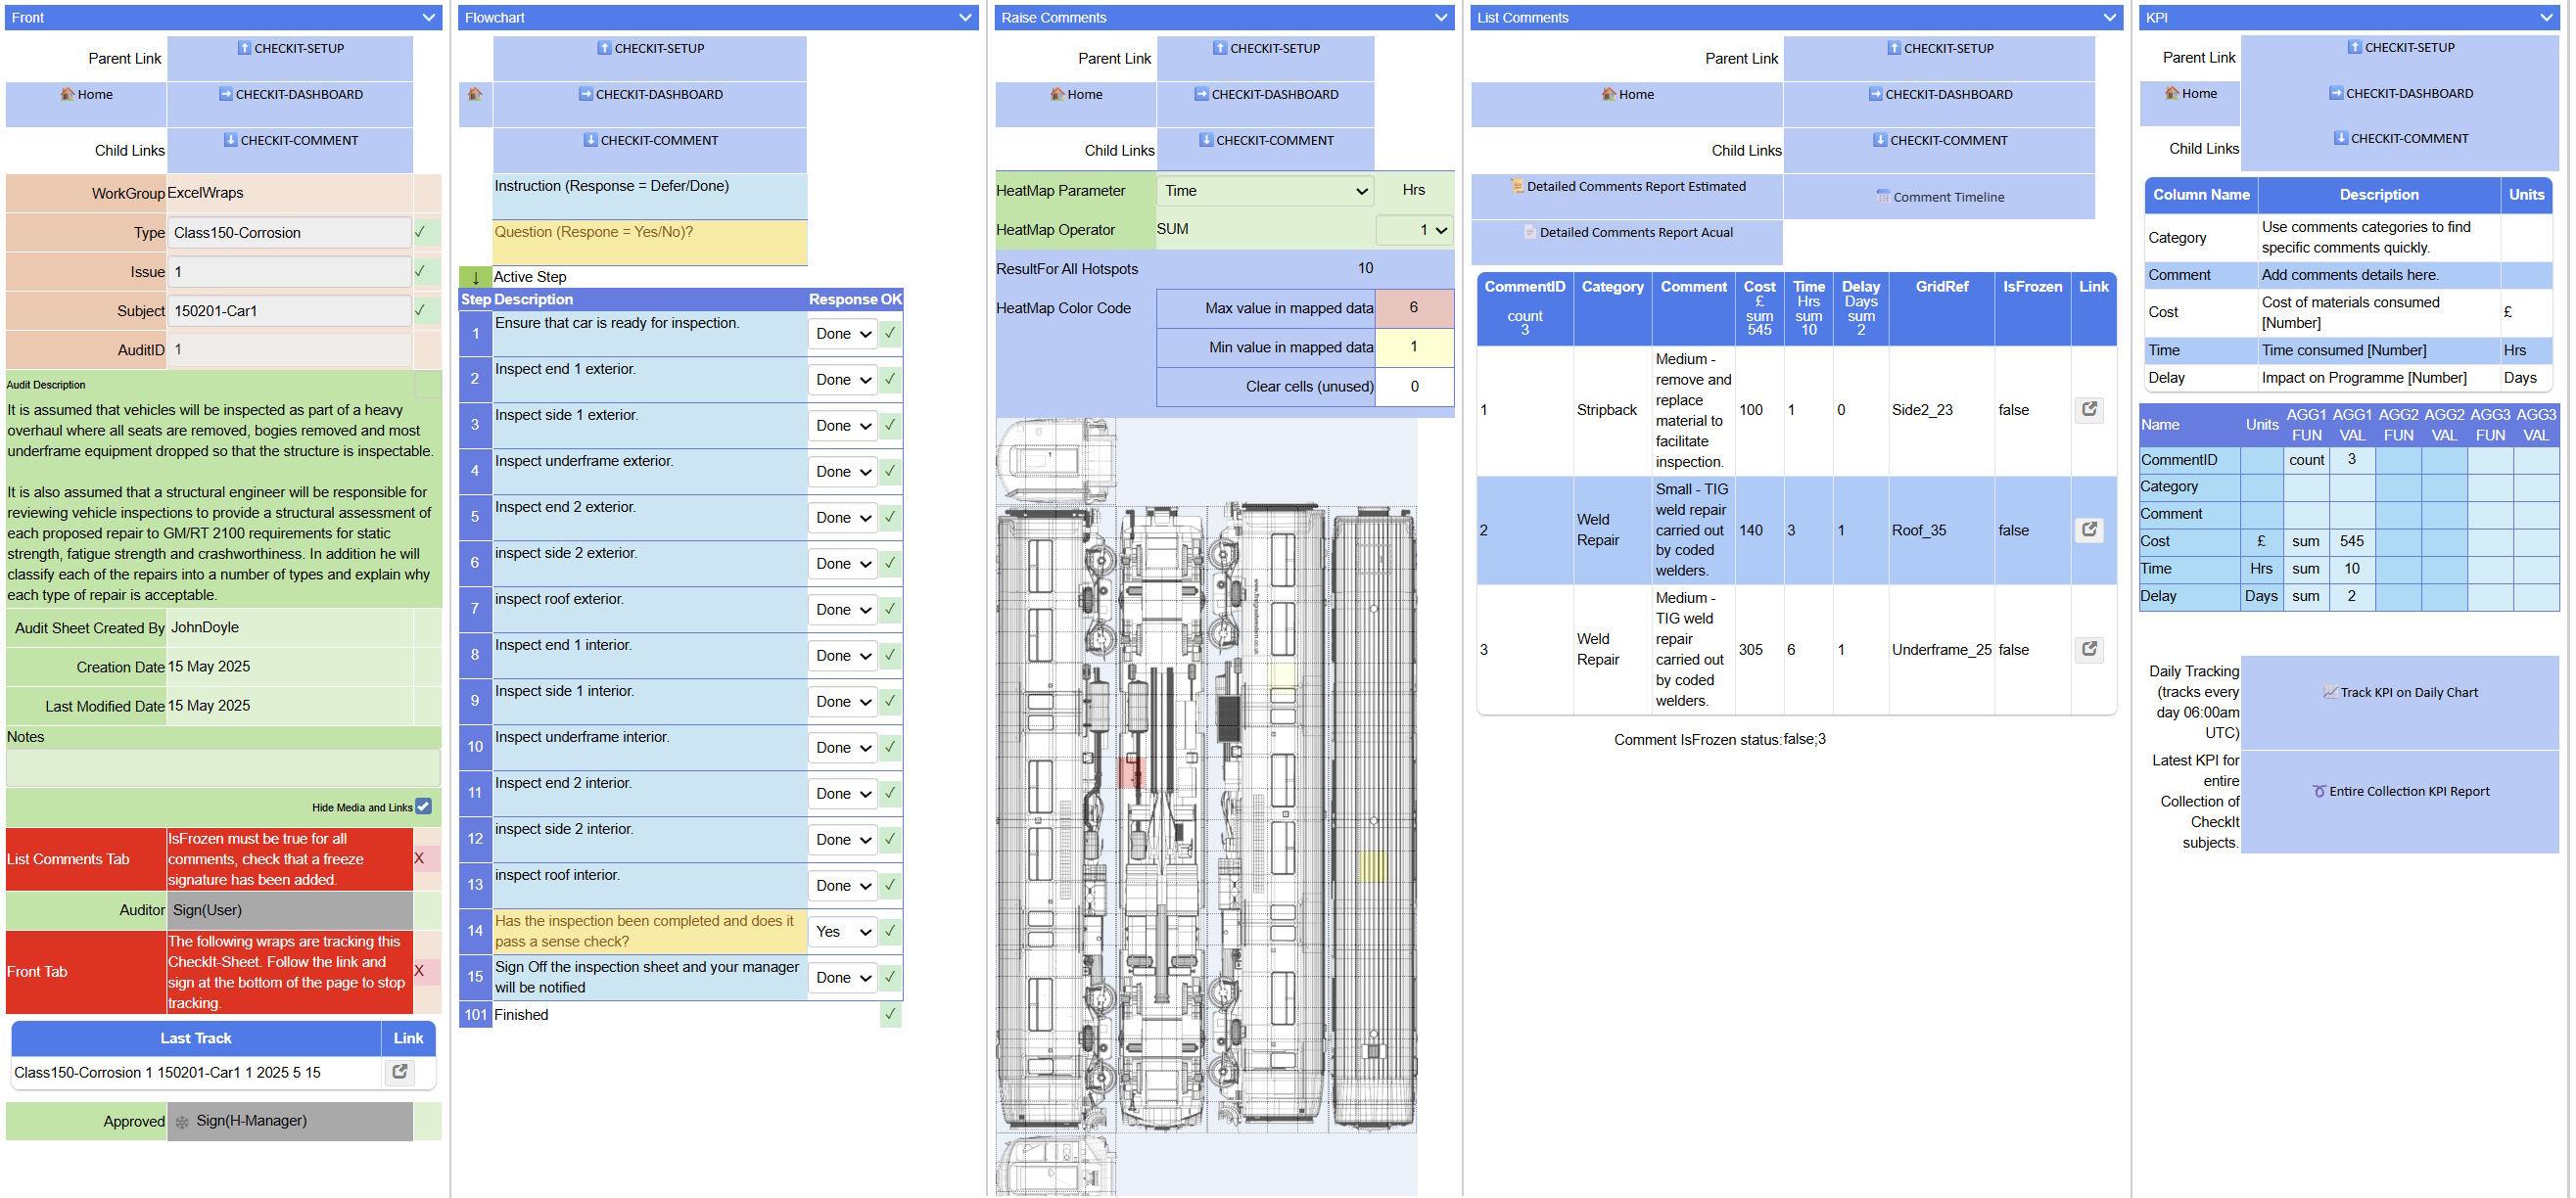
Setting Up a Corrosion Audit (CheckIt-Setup)
1. Creating the Audit Template
- Navigate to the CheckIt-Setup form
- In the Front section:
- Select your Workgroup (e.g., ExcelWraps)
- Choose Type: "Class150-Corrosion"
- The system will assign the next Issue number automatically
- Enter a clear Description of the inspection scope
2. Adding Reference Materials
- Go to the Background tab
- Upload relevant documents:
- Vehicle diagrams
- Class 150 technical drawings
- Previous corrosion reports
- RSSB guidance documents
- Add useful links to:
- GM/RT 2100 requirements
- Maintenance manuals
- Safety standards
3. Configuring the Inspection Workflow
- In the Sheet Workflow tab, define the inspection sequence:
- Start with vehicle preparation checks
- Progress through each area systematically (ends, sides, underframe, roof)
- Include both exterior and interior inspections
- Add quality control checkpoints
4. Setting Up the Visual Inspection Grid
- Upload a Class 150 general arrangement drawing to ImageGrid
- Define clickable areas on the vehicle diagram
- Name each grid area clearly (e.g., "Side1_23", "Underframe_25", "Roof_35")
- Ensure grid complexity stays below 4000 for optimal performance
5. Creating the Comment Bank
In the Comment Bank section, define standard corrosion findings:
Categories:
- Stripback (for areas requiring material removal for inspection)
- Cosmetic Repair (surface corrosion treatment)
- Weld Repair (structural repairs)
- NDT (Non-Destructive Testing requirements)
Parameters to track:
-
- Cost (£): Material costs for remediation
- Time (Hours): Labour hours required
- Delay (Days): Impact on maintenance schedule
6. Configuring KPIs and Options
Set up KPI aggregations:
-
- SUM of costs across all findings
- SUM of time requirements
- SUM of programme delays
Configure Options:
-
- Enable daily tracking for progress monitoring
- Set role requirements:
- User: Can raise findings
- T-Subcontractor: Performs remediation
- T-Client: Approves close-out
- Enforce media uploads for evidence
7. Finalizing the Setup
- Review all sections thoroughly
- Approve and sign the setup digitally
- This locks the template and makes it available for use
Managing Active Audits
Monitoring Progress
- Access the CheckIt-Dashboard to view all active audits
- Review heat maps showing corrosion hotspots
- Track KPIs:
- Total remediation costs
- Time requirements
- Schedule impacts
Quality Assurance
- Ensure auditors are following the defined workflow
- Verify photographic evidence is being captured
- Review remediation proposals from subcontractors
- Monitor close-out approvals
Reporting
- Generate weekly/monthly reports showing:
- Corrosion trends across the fleet
- Cost analysis by vehicle
- Common problem areas
- Remediation effectiveness
For Corrosion Auditors
Overview
As a Corrosion Auditor, you conduct detailed inspections of Class 150 vehicles to identify and document corrosion issues. Your findings directly impact maintenance planning and fleet safety.
Conducting a Corrosion Inspection (CheckIt-Sheet)
1. Starting an Inspection
- Open a new CheckIt-Sheet
- Select the appropriate setup (Class150-Corrosion)
- Enter the Subject (vehicle number, e.g., "150201-Car1")
- The system assigns an AuditID automatically
2. Following the Inspection Workflow
- The Flowchart tab guides you step-by-step:
- Ensure the car is ready for inspection
- Inspect each area in sequence
- Mark each step as "Done" when completed
- Answer Yes/No questions to determine next steps
3. Raising Corrosion Findings
- Go to Raise Comments tab
- Click on the vehicle diagram where corrosion is found
- The system displays a heat map of existing findings
- To raise a new finding:
- Click the specific grid area
- This creates a new CheckIt-Comment
Documenting Findings (CheckIt-Comment)
1. Recording Initial Findings
- In the Raise tab:
- Select the appropriate Category (e.g., "Weld Repair")
- Choose the specific Comment from the bank
- Review/adjust parameters:
- Estimated cost
- Time required
- Programme impact
- Upload photographs showing the corrosion
- Add notes explaining the finding
- Digitally sign to confirm
2. Example Finding Entry
- Category: Weld Repair
- Comment: "Medium - MIG weld repair carried out by coded welders"
- Cost: £300
- Time: 6 hours
- Delay: 0 days
- Evidence: Clear photos showing corrosion extent with ruler for scale
3. Managing Multiple Findings
- Return to the CheckIt-Sheet after each comment
- Continue inspecting and raising findings
- The List Comments tab shows all findings with:
- Running totals of costs and time
- Grid locations
- Status of each finding
Completing the Inspection
1. Final Checks
- Review all areas have been inspected via the workflow
- Verify all significant corrosion has been documented
- Check the heat map for coverage
2. Signing Off
- Complete the final workflow step
- Add any overall notes about the vehicle condition
- Apply your digital signature as the auditor
- This locks the inspection and notifies management
Best Practices for Auditors
Photography Guidelines
- Include a ruler or reference object for scale
- Capture multiple angles of significant corrosion
- Ensure good lighting and focus
- Show both the specific defect and surrounding context
Documentation Standards
- Be specific about location (use grid references)
- Distinguish between surface rust and structural corrosion
- Note any areas that couldn't be fully inspected
- Flag any safety-critical findings immediately
Common Findings to Document
- Surface corrosion requiring cosmetic treatment
- Structural corrosion requiring weld repairs
- Areas needing strip-back for proper inspection
- Locations requiring NDT assessment
- Water ingress points contributing to corrosion
After the Inspection
For Subcontractors (Remediation)
When assigned remediation work:
- Review the finding details and images
- Update actual costs/time if different from estimates
- Document the repair with before/after photos
- Sign off when work is complete
For Clients (Close-out)
When reviewing completed repairs:
- Verify the remediation meets requirements
- Check supporting evidence
- Apply digital signature to accept the work
- This completes the finding lifecycle
Support and Escalation
- For technical queries about corrosion assessment, consult the structural engineer
- For system issues, contact your administrator
- For safety-critical findings, immediately notify management
- Reference GM/RT 2100 requirements for structural assessments
For Remediation Teams (T-Subcontractor Role)
Overview
As a member of the remediation team, you are responsible for carrying out the actual repairs identified during corrosion audits. Your work must meet GM/RT 2100 requirements for static strength, fatigue strength, and crashworthiness.
Accessing Assigned Work
1. Finding Your Assignments
- Log into the SmartFleet system with your T-Subcontractor credentials
- Navigate to your CheckIt-Dashboard
- Look for comments assigned to your team that show:
- Status: "Raised" (awaiting remediation)
- Your role highlighted as remediation responsible
2. Reviewing the Corrosion Finding
- Open the CheckIt-Comment for the specific finding
- In the Raise tab, review:
- Category and Comment: Type of repair required
- Location: Grid reference showing exact position
- Estimated Parameters:
- Cost (£)
- Time (Hours)
- Delay (Days)
- Photographic Evidence: Shows extent of corrosion
- Auditor's Notes: Any special considerations
Performing Remediation Work
1. Pre-Work Assessment
Before starting repairs:
- Visit the Hotspot tab to see exact location on vehicle diagram
- Physically inspect the area to confirm the scope
- Verify you have necessary:
- Materials
- Tools
- Certifications (especially for welding work)
- Safety equipment
2. Remediation Categories and Procedures
Stripback Work:
- Remove material to facilitate proper inspection
- Document what was hidden beneath
- If additional corrosion is found, raise a new comment
- Typical time: 0.5-1.5 hours
Cosmetic Repair:
- Remove surface corrosion using approved methods
- Apply corrosion inhibitors per specification
- Apply protective sealants
- Typical time: 2-6 hours depending on size
Weld Repair (MIG):
- Must be performed by coded welders only
- Follow approved weld procedures
- Ensure proper preparation and post-weld treatment
- Document welder ID and procedure used
- Typical time: 3-9 hours
Weld Repair (TIG):
- For more critical or complex repairs
- Requires specialized TIG certification
- Follow enhanced quality controls
- Typical time: 3-9 hours
- May require 1-3 days programme delay
NDT Requirements:
- Coordinate with certified NDT team
- Ensure area is properly prepared for testing
- Document test results
- Typical time: 3-9 hours
- Usually causes 3-day programme delay
Documenting Remediation
1. Accessing the Remediation Tab
- In the CheckIt-Comment, navigate to Remediation tab
- This becomes available after the Raise tab is signed
2. Updating Information
-
Description of Remediation:
- Enter what repair method was used
- Note any deviations from original plan
- Explain any complications encountered
-
Update Parameters with actual values:
- Cost: Actual material costs (may differ from estimate)
- Time: Actual hours spent
- Delay: Actual programme impact
-
Critical: Update parameters using the "Update Parameters from Remediation SWF" button
3. Evidence Requirements
Mandatory photo documentation includes:
- Before repair (showing prepared area)
- During repair (especially for welds)
- After repair (showing completed work)
- Any additional findings discovered
For weld repairs, also document:
- Welder certification number
- Weld procedure specification used
- Any NDT results
4. Completing Remediation
- Add comprehensive notes about the repair
- Confirm: "Check to confirm that this is an accurate record"
- Apply digital signature as T-Subcontractor
- This locks the remediation record and notifies for close-out
Best Practices for Remediation Teams
Quality Standards
- Never compromise on safety or structural integrity
- If the repair scope exceeds the original finding, consult the structural engineer
- Ensure all repairs meet GM/RT 2100 requirements
- Use only approved materials and procedures
Documentation Excellence
- Take photos with good lighting and clear focus
- Include measurement references in photos
- Document any additional corrosion found
- Keep records of all materials used with batch numbers
Common Issues and Solutions
Finding additional corrosion:
- Complete the assigned repair
- Raise a new CheckIt-Comment for additional findings
- Link to the original finding in notes
Access difficulties:
- Document why area couldn't be fully repaired
- Propose alternative solutions
- May require engineering assessment
Material substitutions:
- Only use approved alternatives
- Document why substitution was necessary
- Update cost parameters accordingly
For Close-Out Approvers (T-Client Role)
Overview
As a Close-Out Approver, you provide the final quality check and acceptance of remediation work. Your approval confirms that repairs meet all safety and quality standards.
Accessing Work for Close-Out
1. Finding Completed Remediations
- Log in with your T-Client credentials
- Access your CheckIt-Dashboard
- Look for comments showing:
- Status: "Remediation Complete"
- Awaiting close-out approval
2. Review Hierarchy
You may be approving work for:
- Your own organization (as asset owner)
- On behalf of regulatory compliance
- As technical authority for specific repair types
Conducting Close-Out Review
1. Comprehensive Review Process
Navigate through all tabs in the CheckIt-Comment:
Review the Original Finding (Raise Tab):
- Understand what corrosion was identified
- Note the location and severity
- Check estimated parameters
Examine Remediation (Remediation Tab):
- Verify repair method was appropriate
- Compare actual vs. estimated parameters
- Review photographic evidence
- Check remediation notes for any concerns
Location Verification (Hotspot Tab):
- Confirm repair was at correct location
- Verify entire affected area was addressed
2. Critical Checkpoints
For Structural Repairs (Weld Repairs):
- Verify welder certification was valid
- Confirm correct procedure was followed
- Check for NDT results where required
- Ensure repair meets GM/RT 2100 requirements
For Surface Treatments (Cosmetic Repairs):
- Confirm all corrosion was removed
- Verify protective coatings were applied
- Check that repair will prevent recurrence
For Inspection Access (Stripback):
- Ensure hidden areas were properly inspected
- Verify any additional findings were raised
- Confirm areas were properly protected after inspection
3. Evaluation Criteria
Accept the remediation when:
- Repair fully addresses the original finding
- Quality meets or exceeds requirements
- Documentation is complete and clear
- No safety concerns remain
- Work complies with all specifications
Reject or query when:
- Repair appears incomplete
- Documentation is insufficient
- Safety concerns exist
- Additional work is needed
- Specifications weren't followed
Making the Close-Out Decision
1. Accepting the Work
If remediation is satisfactory:
- Navigate to Close Out tab
- Add notes confirming acceptance
- State why the repair meets requirements
- Apply your digital signature as T-Client
- This permanently closes the finding
2. Rejecting or Querying
If issues exist:
- Do NOT sign the close-out
- Contact the remediation team directly
- Document concerns in the system
- Request additional work or evidence
- Only close out when fully satisfied
Close-Out Best Practices
Documentation Standards
- Always add close-out notes explaining your decision
- Reference specific standards met (e.g., "Meets GM/RT 2100 section X")
- Note any follow-up actions required
- Comment on repair quality for future reference
Risk-Based Approach
High Priority (Safety Critical):
- Require additional evidence
- May need independent verification
- Consider requesting NDT confirmation
- Document extra diligence applied
Medium Priority (Structural):
- Ensure repairs prevent progression
- Verify appropriate repair method
- Confirm adequate safety margins
Low Priority (Cosmetic):
- Confirm aesthetic standards met
- Verify corrosion protection applied
- Check cost-effectiveness
Common Close-Out Scenarios
Excellent Remediation:
- "Repair exceeds requirements. High-quality welding with excellent preparation and finishing. Photographic evidence clearly shows all corrosion removed and area properly protected."
Acceptable with Notes:
- "Repair meets minimum requirements. Recommend monitoring this area at next overhaul due to proximity to water ingress point."
Conditional Acceptance:
- "Repair acceptable for current service. However, permanent repair should be planned at next heavy overhaul. Temporary repair documented and risk assessed as acceptable."
Escalation and Support
When to Escalate
- Structural integrity concerns
- Disagreement with remediation team
- Repairs outside normal parameters
- Safety-critical findings
Technical Support
- Consult structural engineers for complex repairs
- Reference maintenance manuals
- Check with OEM requirements
- Coordinate with safety team
Audit Trail and Compliance
Your close-out creates a permanent record that:
- Demonstrates due diligence
- Provides evidence for regulatory compliance
- Supports warranty claims
- Guides future maintenance decisions
Remember: Your signature represents acceptance of safety and quality. Never approve work you're not completely satisfied with.
Post Close-Out
Once signed:
- The finding is permanently closed
- No further edits are possible
- The complete record is archived
- KPIs are updated automatically
- Fleet-wide trends are analyzed
This completion of the corrosion management cycle ensures the continued safety and reliability of the Class 150 fleet while maintaining full compliance with regulatory requirements.